Showing posts with label Chain Photos. Show all posts
Coils
Coils are some of the toughest types of freight to haul because of their concentrated weight in one small area on the trailer. They pack a punch if they get loose. There are many stories of these coils rolling through truck cabs and through vehicles after their chains and straps loosen up. The trailer pictured here has small blocks called "turtles" that slide from front to rear and from side to side on the trailer. Just one of these blocks can support the entire weight of the trailer.
In addition to the chains there are also straps going over the coil. The chains have been known to be damaged by the coils and the coils have been damaged by the chains so there is a metal chain protector in between the chains and the coil. The chain protector has little humps on it to keep the chain centered on the protector. These protectors were always made of steel, but there have been some made of steel and then covered in tough rubber to give both protection to the chain and to the freight.
Pictured here are snap binders which are my preferred type of binder. The don't rust, are easy to use, and if secured properly, will last the entire trip without having to be tightened again. Since these chains are going from one side of the trailer back to the same side, they are only getting half of the working load limit. The straps go from one side to the other so they are getting the full working load limit.
There are three basic ways to load a coil: Eye to the sky (the style seen on the coils to the front of the trailer), shotgun (the style of the coil towards the rear of the trailer), and suicide (where the coil is loaded so that the eye in the center of the coil is facing the sides of the trailer). The two ways depicted here are the preferred loading styles for coils and the safest being eye to the sky. The coils that are loaded eye to the sky style are secured using straps with strap protectors and these coils are also heavily wrapped in plastic so it is unlikely that the straps would be cut in a sudden stop. Chains are the best method for securing all types of coils and a coil would never be secured in either eye to the sky style or suicide style without chains.
The eye to the sky or suicide coils have coil racks, dunnage (4X4 lumber) and rubber pieces between the coil and the trailer. This gives the coil a cradle to sit in to minimize movement of the coil. Because the coils have so much weight in such a small area, they can damage a trailer very easily. Many flatbed trailers have a marking on the frame rail specifying where the placement of one single coil ,that is the maximum weight the trailer can handle, will sit safely. In the case of this trailer, the maximum load for the trailer is 60,000 lbs. and there are coils that weigh that much. I wouldn't be able to haul a coil that heavy, but if you were set up to haul one that heavy, you would want to make sure that the coil was situated perfectly. Not only do you need to worry about the securement of the coil to prevent it from falling off the trailer in the event of an accident, but you need to make sure that the coil doesn't damage the trailer.
These coils were tarped and protected from the elements to arrive safe and sound thousands of miles away. The metal was used in a factory to eventually become car parts.
The Good, The Bad, And The Ugly
THE GOOD
I'm going to start posting some pictures on here of some flatbed loads. I am calling it "The Good, The Bad, And The Ugly" after the movie of course. And if you know anything about truckers, you know that we love that movie. Who doesn't love that movie? These aren't necessarily my loads because it would take years to compile a long list of my flatbed loads on here. At the truckstops and along the way, I have seen numerous loads that will make for good and bad examples of how to secure a flatbed load. And each one will be labelled with one of my three monikers. Here we go:
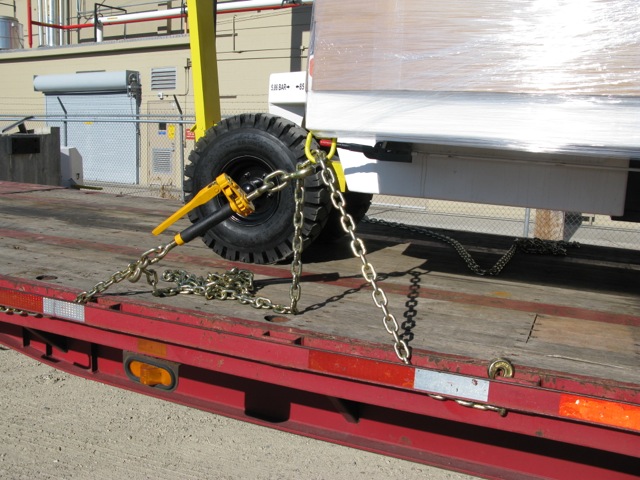
This is a Humvee that is chained down with the direct method of chaining using one chain on each end of the vehicle. This is the best method of chaining this type of freight. There are only two chains on each Humvee. One chain on the front and one on the back of each vehicle. This gives each tie down point half the working load limit (WLL). Though indirect would yield the entire WLL, it isn't needed here because the weight of the Humvee is low enough for 1/2 the WLL on each tie down point.
Note how the excess chain is draped through the pintle hook on the vehicle so it doesn't hang down on the trailer. Knowing the right working load limit for the freight will allow you to get the right size and number of tie downs for each load so that you don't have to work too hard, and still achieve more than the needed securement for the freight.
Chaining each tie down point independently on vehicles with tires and suspension, keeps the vehicle from moving in any direction. It also works with the suspension of the vehicle to keep the chain binders from popping off the chains. When vehicles with suspensions and inflated tires are transported on trailers, they move up and down on the trailer depending on the condition of the road and the ambient outside air temperature. Lower temperatures deflate tires and as you drive the suspension will expand and contract. You want to tighten the binders and chains as much as you can, but you will never completely get the play out of it because of the suspension and tires.
You should keep track of the regulations in regards to each load that you haul so that you are in compliance with the FMCSA and the DOT. For this load, I have listed one of the important regulations below:
Section 392.9 of the FMCSA regulations states that the operator must:
(2) Inspect the cargo and the devices used to secure the cargo within the first 50 miles after beginning a trip and cause any adjustments to be made to the cargo or load securement devices as necessary, including adding more securement devices, to ensure that cargo cannot shift on or within, or fall from the commercial motor vehicle; and(3) Reexamine the commercial motor vehicle's cargo and its load securement devices during the course of transportation and make any necessary adjustment to the cargo or load securement devices, including adding more securement devices, to ensure that cargo cannot shift on or within, or fall from, the commercial motor vehicle. Reexamination and any necessary adjustments must be made whenever—(i) The driver makes a change of his/her duty status; or(ii) The commercial motor vehicle has been driven for 3 hours; or(iii) The commercial motor vehicle has been driven for 150 miles, whichever occurs first.Click here to see the complete FMCSA Rule
Direct Tie Down Versus Indirect Tie Downs
There are two accepted methods for securing a load. Direct and Indirect.
Shown here is Direct Securement:
Here is an example of Indirect securement with only half WLL:
True Indirect securement for full WLL would show the chain going from one side of the trailer to the other side.
Direct securement is a method where the securement device goes from the trailer to the load.
Indirect is a method where the securement device goes from the trailer, through or over the load and then back to the trailer.
Direct securement reduces the Working Load Limit (WLL) of the securement device by half as it doesn't spread the force of the tie down to the entire tie down. This method will put the entire load securement of the tie down point the device is tied to onto one tie down point on the trailer.
Indirect securement allows the entire WLL of the securement device to be used on the tie down point it is tied to, over, or through as long as it goes from one side of the trailer to the other.
Over time there will be pictures on here of different tie down methods as well as explanations as to why those methods were chosen and how they hold up during transit.
Oversized Load 1
An oversized load that was only 9 feet, 4 inches wide.
I started with 4 pieces of wooden dunnage that were 4 X 4 X 8 feet wooden timbers.
Next the freight was placed on top of the dunnage. I used 2 pieces of dunnage per piece so that the dunnage wouldn't come loose and so that the freight is stable. Each piece was secured with 2- 5/16 inch chains and 2 - snap binders. The chains were pushed through the holes in the freight with 10 foot long 1 inch aluminum square tubes. After the snap binders were secured, they were wrapped with a small twist chain with a snap link attached, then the excess chain was wrapped around the binders.
The next step after placing and securing the freight is to protect the freight from the elements and also to protect the tarps from the freight at the same time. To start off, I used edge protectors on all sharp edges and then layed felt pads out over the load.
Now the felt pads are unrolled over the entire load to protect the tarps from the sharp edges of the sides of the load.
Now the tarps are unrolled over the entire load, starting with the back tarp and then the front tarp is unrolled over the front tarp.
Labels:
Chain Photos,
Chains,
Flatbed Load Securement,
Flatbed Loads,
Photos,
Tarp Photos,
Tarps
Subscribe to:
Posts (Atom)